🥜🍫 Mini Chocolate, Caramel & Peanut Tartlets – A Refined Gourmet Treat
Elevating the Candy Bar: Introduction to the Chocolate Peanut Tartlet
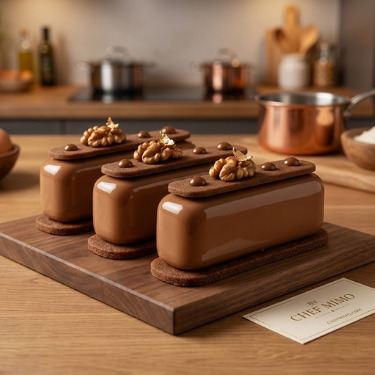
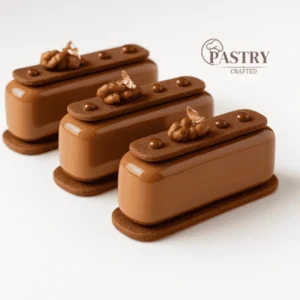
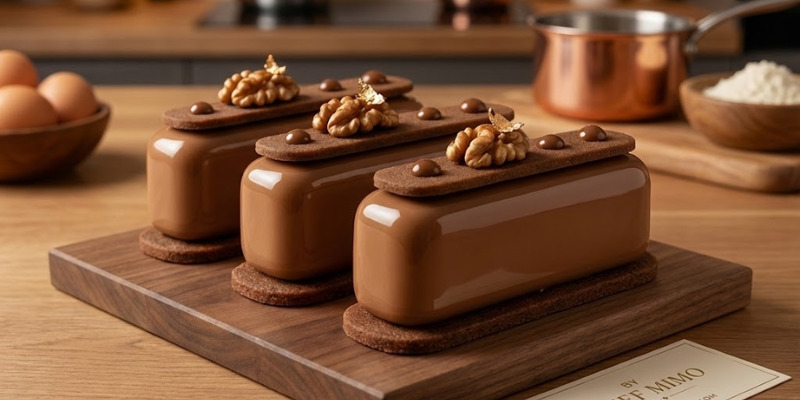
There is a holy trinity in the world of confectionery: Chocolate, Caramel, and Peanuts. While often associated with the humble candy bar, this Mini Chocolate, Caramel & Peanut Tartlet transforms that nostalgic flavor profile into a work of high-end French pâtisserie.This is not a simple tart; it is a complex, multi-textured "Petit Gâteau." It features a Cocoa Shortcrust shell that snaps on the palate, holding a hidden core. The heart of the dessert is a sophisticated "sandwich" insert: a layer of soft Cocoa Sponge and a gooey Salted Peanut Caramel Cream. This core is encased in a light Dark Chocolate Mousse (65%) and finished with a glossy Mirror Glaze.Why make this? It is the ultimate lesson in assembly. Unlike a standard tart where layers are simply stacked, this recipe utilizes "Reverse Assembly" techniques (freezing the mousse in a mold) combined with classic baking. It balances the richness of dark chocolate with the salinity of the caramel and the earthy crunch of roasted peanuts, creating a bite that is luxurious yet remarkably balanced.Ingredients
✳️ Cocoa Biscuit Sponge
- 150 g whole eggs
- 60 g sugar
- 38 g acacia honey
- 50 g almond powder
- 60 g flour T55
- 15 g unsweetened cocoa powder
- 4.5 g baking powder
- 1.5 g fine salt
- 60 g heavy cream 30% fat
- 38 g melted butter
✳️ Salted Caramel Cream with Peanuts
- 100 g sugar
- 165 g heavy cream hot
- 33 g butter
- 1 pinch fleur de sel
- 2.6 g gelatin 200 bloom
- 15.6 g cold water for gelatin
- Roasted unsalted peanuts chopped
✳️ Dark Chocolate Mousse 65%
- 95 g whole milk
- 120 g dark chocolate 65%, e.g., Inaya
- 190 g heavy cream whipped
- 1.9 g gelatin 200 bloom
- 11.4 g cold water for gelatin
✳️ Cocoa Almond Sweet Shortcrust Pastry
- 200 g flour T55
- 24 g almond flour
- 80 g powdered sugar
- 120 g butter cold
- 38 g whole eggs
- 12 g unsweetened cocoa powder
- 1 pinch fine salt
✳️ Mirror Glaze
- 150 g sugar
- 150 g glucose syrup
- 80 g water
- 100 g sweetened condensed milk
- 75 g white chocolate
- 75 g milk chocolate
- 1.5 g yellow fat-soluble food coloring
- 0.7 g orange fat-soluble food coloring
- 9 g gelatin 200 bloom
- 54 g cold water for gelatin
Mastering Textures and Flavors📗 Download your PDF now!
Instructions
Cocoa Sponge
- Using an immersion blender, mix all ingredients except butter until smooth.
- Add melted butter and blend again.
- Spread 180 g into a 22.5 x 22.5 cm square frame over a Silpat mat.
- Bake at 150°C for 9 minutes.
- Repeat for a second layer. Cool and reserve both.
Salted Caramel Cream
- Hydrate gelatin in water.
- Make a dry caramel with sugar, then carefully deglaze with hot cream.
- Add butter and fleur de sel, then incorporate the gelatin.
- Stir in chopped roasted peanuts.
🧩 Insert Assembly
- Line a 20 x 20 cm frame with one trimmed sponge.
- Pour the caramel-peanut cream over it. Chill for 30 minutes, then place second sponge on top.
- Freeze the entire insert for 12 hours.
- Trim frozen insert into 10 rectangles of 11 x 1.7 cm each. Keep frozen.
Dark Chocolate Mousse
- Hydrate gelatin.
- Heat milk and pour over chocolate. Stir until melted.
- Add gelatin and emulsify using an immersion blender. Cool to 40°C.
- Fold in whipped cream gently with a spatula. Briefly whisk to smooth.
🧁 Mousse Filling
- Fill each Silikomart Fashion Éclair mold ¾ full with mousse.
- Insert a frozen caramel insert and press down.
- Smooth the top with an offset spatula. Freeze for 12 hours.
- Cocoa Sweet Pastry Shells
- Rub together butter, almond flour, and powdered sugar.
- Add egg, then flour, cocoa, and salt.
- Form dough, wrap, and refrigerate overnight.
- Roll to 2–3 mm, chill 1 hour.
- Cut 10 large bases and 10 smaller tops using the Fashion Éclair cutter.
- Bake between two Silpain mats at 160°C for 23–25 minutes. Cool fully.
Mirror Glaze
- Hydrate gelatin in cold water.
- Heat sugar, glucose, and water to 103°C.
- Pour over condensed milk and add chocolates, gelatin, and colorings.
- Blend with immersion blender and refrigerate overnight.
- Reheat to 35°C before glazing.
✨ Final Assembly
- Unmold frozen mousse inserts and place on a rack.
- Glaze with orange mirror glaze at 35°C. Let excess drip off for 2–3 minutes.
- Place each glazed mousse onto a cocoa tart base.
- Add the smaller cocoa pastry top.
- Pipe decorative glaze dots and place a roasted peanut on each.
- Finish with edible gold leaf if desired.
Notes
 The Science of Ingredients: Chemistry of Texture and Shine
This recipe relies on specific ingredients to maintain moisture in thin layers and shine on the exterior.
1. Acacia Honey (The Sponge Humectant)
The Cocoa Sponge uses 38g of Acacia Honey.- The Science: Cocoa powder is drying. In a sponge this thin (baked in 9 minutes), it would normally turn into a dry cracker. Honey is a natural humectant (it attracts water). It ensures that the thin layer of sponge remains moist and flexible inside the mousse, providing a soft "cakey" mouthfeel that contrasts with the crisp tart shell.
2. Gelatin Bloom (200 Bloom)
The recipe specifies 200 Bloom gelatin for the Mousse, Caramel, and Glaze.- The Science: Bloom strength measures the gelling power. "200 Bloom" is standard "Gold/Silver" grade. Using the correct bloom is vital for the Caramel Cream. We want a cream that holds its shape when cut (so it doesn't ooze out entirely) but melts instantly in the mouth. A higher bloom (250) would make it rubbery; a lower bloom (160) might cause the insert to collapse during thawing.
3. Glucose Syrup (The Glaze Body)
The Mirror Glaze relies on 150g of Glucose Syrup.- The Science: A glaze needs to be viscous enough to coat the vertical sides of the mousse without running off completely. Glucose provides this viscosity. Chemically, it also prevents the sucrose (sugar) from recrystallizing, which preserves the mirror-like shine. Without glucose, the glaze would turn dull and gritty in the fridge.
4. Fleur de Sel (The Flavor Potentiator)
Salt is used in the Caramel, the Sponge, and the Pastry.- The Science: Salt suppresses bitterness. In a dessert using 65% dark chocolate and cocoa powder, the bitterness can become overwhelming. Fleur de Sel (a flaky sea salt) pops on the palate, cutting the richness of the fat and suppressing the bitter notes of the cocoa, allowing the fruity notes of the chocolate and the roasted notes of the peanuts to shine.
Essential Professional Kitchen Tools
To achieve the "Fashion Éclair" look, specific equipment is non-negotiable.-
Silikomart "Fashion Éclair" Kit
- Why you need it: This recipe is designed around this specific mold geometry (oblong with rounded edges). The kit includes the silicone mold for the mousse and the perforated cutter for the tart shell. Using makeshift molds will alter the ratios of mousse-to-tart.
-
Perforated Baking Mats (Silpain)
- Why you need it: The recipe calls for baking the tart shells between two Silpain mats. This technique forces the dough to remain perfectly flat (no puffing up) and imprints a beautiful mesh texture on the surface of the pastry, giving it a modern, industrial-chic finish.
-
Immersion Blender
- Why you need it: For the Cocoa Sponge and Glaze. Blending the sponge batter is unconventional but effective for creating a very tight, uniform crumb structure suitable for thin sheets. For the glaze, it is essential to emulsify the chocolate and condensed milk without adding air bubbles.
-
Square Cake Frame (20cm)
- Why you need it: For the Insert. You cannot pour the caramel freely; it needs to set within a specific boundary so you can cut precise 11x1.7cm bars that fit perfectly inside the mousse mold.
Expert Tips and Success Hacks
Master the intricate assembly with these professional secrets.1. The "Sandwich" Insert Technique
The insert is the trickiest part.- The Hack: Do not try to spread caramel onto a loose sponge. Place the first sponge sheet at the bottom of the frame. Pour the warm caramel over it and let it set slightly (chill 30 mins) before placing the second sponge on top. If you put the top sponge on liquid caramel, it will sink unevenly. Freeze the whole block solid before cutting.
2. Glazing Temperature Precision
The glaze contains both white and milk chocolate.-
The Hack: This glaze behaves differently than dark chocolate glazes. The target temperature is 35°C.
- >38°C: It will be too thin, revealing the mousse color underneath.
- <32°C: It will be too thick and leave a heavy, gelatinous layer on your delicate tart. Use a digital thermometer and stir gently to cool it down.
3. The "Double Cut" for Tart Shells
The pastry shrinks slightly when baked.- The Hack: The recipe calls for cutting bases and "tops." Cut the dough while it is exceedingly cold. After baking between the mats, if the edges look slightly rough or spread out, you can use a microplane grater to gently file the edges of the baked shells for a razor-sharp silhouette.
4. Mousse Filling Strategy
Air pockets ruin the shape.- The Hack: Pipe the mousse into the silicone mold until it is 1/3 full. Use a small spoon to push the mousse up the sides of the mold cavities, eliminating air bubbles in the corners. Then push the frozen caramel-sponge insert into the mousse. Scrape the top perfectly flat.
5. Managing the Peanuts
- The Hack: Ensure the peanuts in the caramel cream are chopped finely. If the chunks are too large, they will drag through the caramel when you try to slice the frozen insert, causing the layers to separate or break.
Frequently Asked Questions (FAQ)
Q1: Can I use hazelnuts instead of peanuts? A: Absolutely. This converts the dessert from a "Snickers" profile to a refined Praline profile. Hazelnut praline pairs beautifully with the dark chocolate and caramel. Roast the hazelnuts deeply for the best flavor. Q2: Why do we use colored glaze instead of caramel glaze? A: A true caramel glaze can be very sticky and sweet. This recipe uses a white/milk chocolate base tinted with yellow and orange to look like caramel. This provides a better texture (clean cut) and is less cloying, balancing the sugar levels of the dessert. Q3: Can I assemble these in advance? A: Yes.- Frozen Mousse (Glazed): Can sit in the fridge for 24 hours.
- Tart Shells: Can be kept in an airtight box for 3 days.
- Final Assembly: Place the glazed mousse onto the tart shell no more than 4-6 hours before serving. If left too long, the moisture from the mousse will eventually soften the crisp tart shell.
Tried this recipe?Let us know how it was!
I’m Chef Mimo, a passionate pastry chef with over 17 years of experience in the world of fine desserts. I specialize in French-style entremets, refined cakes, and creative chocolate work. Pastry is not just my profession—it’s my lifelong passion. Through PastryCrafted.com, I love sharing my recipes, techniques, and inspirations with anyone who dreams of mastering the art of pastry. Whether you’re a curious beginner or a seasoned pro, you’re welcome in my sweet world.