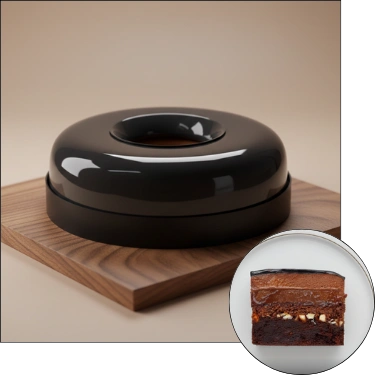
The most elegant and intense chocolate cake, featuring a fudge dark chocolate brownie base, crunchy cacao layer, silky milk chocolate ganache, and a smooth Nutella mousse.

Yield: 8-10 Servings

Target Mold Size: 18 cm diameter silicone mold (e.g., Silikomart Universo)

DAY ONE: Component Preparation & Internal Insert
1) Double Brownie Chocolate Cake with Hazelnut (Base)
| Ingredients | Weight (g) | Notes |
|---|---|---|
| Dark Chocolate (approx. 55%) | 100 g | Finely chopped |
| Butter | 100 g | Slow melted |
| Caster Sugar | 90 g | |
| Eggs | 125 g | Approximately 2½ eggs |
| All-Purpose Flour | 3 g | Approximately ½ tbsp |
| Dark Chocolate (semi-chopped, 55%+) | 75 g | For fudgy texture |
| Hazelnuts | 40 g | Chopped |
| Salt | Pinch |
Method
- Melt Base: Slowly melt the 100 g of butter in a small saucepan over low heat. Add the 100 g of chopped dark chocolate and stir until completely melted. Remove the saucepan from the heat and add the sugar.
- Combine Eggs: In a separate bowl, whisk the eggs lightly with a fork. Let the chocolate dough cool briefly, then gradually add the eggs while whisking constantly with a hand whisk.
- Finish Batter: Finally, add the flour and salt, folding briefly. Then fold in the 75 g of semi-chopped dark chocolate.
- Bake: Pour the dough into a 16 cm springform or pastry ring lined with baking paper. Chop the 40 g of hazelnuts and sprinkle them on top. Bake for approx. 20–23 minutes at 180°C until the brownie feels slightly soft and “unbaked” in the center.
- Set Insert: Let the brownie cool completely. Place it in a 16 cm pastry ring lined with an acetate collar and parchment paper base. Level the surface slightly with a glass. Put the cake in the freezer while preparing the crunch.
2) Milk Chocolate Crunch with Cocoa (Layer 2)
| Ingredients | Weight (g) | Notes |
|---|---|---|
| Milk Chocolate (30-35% cocoa solids) | 50 g | Melted |
| Nutella (or similar spread) | 19 g | Approximately 1¼ tbsp |
| Cocoa Powder (unsweetened) | 3 g | Approximately 1 tsp |
| Feuilletine Flakes | 75 g | |
| Salt | Pinch |
Method
- Melt Base: Carefully melt the milk chocolate in a small saucepan. Set the pan aside.
- Combine Crunch: Stir in the feuilletine, Nutella, cocoa powder, and salt into the chocolate mixture.
- Layer and Freeze: Spread the crunch evenly on top of the brownie cake (in the 16 cm ring). Level the surface with a palette knife. Put the cake back in the freezer.
3) Milk Chocolate Ganache (Layer 3)
| Ingredients | Weight (g) | Notes |
|---|---|---|
| Milk Chocolate (30-35% cocoa solids) | 180 g | Finely chopped |
| Heavy Cream (35% fat) | 103 g | Approximately 100 ml |
Method
- Melt Chocolate: Carefully melt the chocolate and put it aside in a bowl.
- Emulsify: Heat the heavy cream until almost to a boil. Remove from heat. Pour the hot cream over the chocolate while stirring in the center with a rubber spatula.
- Blend and Layer: Hand blend the ganache for a smoother finish. Pour the ganache over the set crunch layer. Put the cake back in the freezer. The ganache needs to set before the next layer can be added.
DAY TWO: Mousse & Entremet Construction
4) Milk Chocolate Nutella Mousse
| Ingredients | Weight (g) | Notes |
|---|---|---|
| Gelatin Sheets (240 Bloom) | 4.0 g | Approximately 2¼ sheets, bloomed |
| Milk Chocolate (30-35% cocoa solids) | 200 g | |
| Nutella (or similar spread) | 100 g | |
| Heavy Cream (total) | 309 g | Split |
| Heavy Cream (to be heated) | 103 g | Approximately 100 ml |
| Heavy Cream (whipped) | 206 g | Approximately 200 ml, chilled |
Method
- Soften Gelatin: Soak gelatin in cold water for 5–10 minutes.
- Melt Base: Carefully melt the milk chocolate and Nutella together in a saucepan. Set aside in a bowl.
- Infuse Cream: Heat 103 g heavy cream until almost to a boil. Remove the pan from the heat and whisk in the gelatin.
- Emulsify: Pour the hot cream over the chocolate/Nutella mixture while stirring in the center with a rubber spatula. Let the mass cool to lukewarm ($\approx 28^\circ\text{C}$).
- Whip and Fold: Whip 206 g heavy cream to a light foam. Gently fold the whipped cream into the lukewarm mass.
- Partial Set: Pour the mousse into an 18 cm silicone mold (e.g., Silikomart Universo) lined with an acetate collar. Place the mousse in the fridge until it is set slightly (forms a soft peak when tested with a spoon).
- Insert Core: Take the fully frozen 16 cm cake insert out of the freezer and press it into the mousse with the ganache layer facing downwards.
- Freeze: Put the cake in the freezer overnight until it can set completely.
DAY THREE: Glazing, Decoration & Final Finish
5) Mirror Glaze
| Ingredients | Weight (g) | Notes |
|---|---|---|
| Gelatin Sheets (240 Bloom) | 10.5 g | Approximately 6 sheets, bloomed |
| White Chocolate (30-35% cocoa butter) | 150 g | |
| Heavy Cream | 103 g | Approximately 100 ml |
| Water | 50 g | Approximately 50 ml |
| Caster Sugar | 150 g | |
| Glucose Syrup | 150 g | |
| Black Coloring Paste | – |
Method
- Soften Gelatin: Soak gelatin in cold water for 5–10 minutes.
- Prepare Syrup: Finely chop the chocolate and put it in a large jug. Heat the sugar, water, cream, and glucose syrup until almost to a boil. Remove the pan from the heat and whisk in the gelatin.
- Emulsify and Color: Pour the hot mixture over the chocolate in the jug. Blend by hand, avoiding air bubbles. Add black food coloring paste.
- Cool and Glaze: Cover the surface with cling film and let it cool down to 35°C–34°C. Take the frozen cake out of the freezer, place it on a cooling rack, and pour the glaze over the cake.
- Thaw: Place the cake on a cake plate and let it thaw in the fridge for approx. 6 hours.
6) Chocolate Decoration
| Materials | Weight (g) | Notes |
|---|---|---|
| White Chocolate | 250 g | Tempered (colored black) |
| Black Food Coloring Powder | – | |
| Crispearls | Small handful | For elevating the spire |
Chocolate Ribbons & Spire (Dimensions):
| Element | Dimensions | Diameter |
|---|---|---|
| Chocolate ribbon around the cake | 2.5 cm × 58 cm | 18 cm |
| Chocolate spire | – | 12 cm |
Method (Decoration)
- Color Chocolate: Temper the white chocolate and mix in the black food coloring powder.
- Make Spire and Ribbon: Create the chocolate spire (often using curved forms) and the ribbon (2.5 cm × 58 cm) using the tempered black chocolate on acetate sheets.
- Final Assembly: Place the chocolate ribbon around the cake. Place a small amount of melted chocolate on top of the cake, arrange the crispearls, and place the chocolate spire on top to secure it.
I’m Chef Mimo, a passionate pastry chef with over 17 years of experience in the world of fine desserts. I specialize in French-style entremets, refined cakes, and creative chocolate work. Pastry is not just my profession—it’s my lifelong passion. Through PastryCrafted.com, I love sharing my recipes, techniques, and inspirations with anyone who dreams of mastering the art of pastry. Whether you’re a curious beginner or a seasoned pro, you’re welcome in my sweet world.