My Basic recipes
PERFECT FRENCH MACARONS
- Yield
- Approximately 35–45 assembled macarons, depending on piping size
- Style
- French Macarons — Italian Meringue Method
- Difficulty
- Advanced
- Baking Time
- Approximately 14 minutes
Italian Meringue Method · Smooth Almond Shells · Delicate Crisp Exterior · Soft, Tender Center
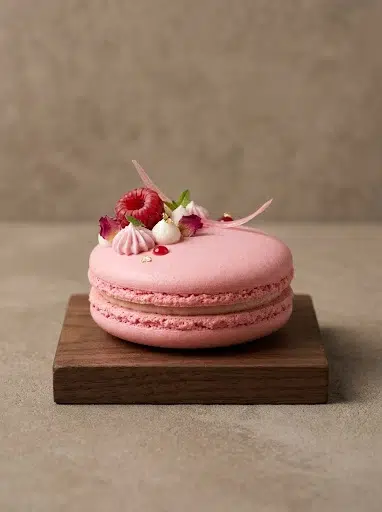
Elegant French macarons prepared using the Italian meringue method, combining finely ground almonds with a glossy, stable meringue. The carefully controlled sugar syrup, precise folding technique, and gentle baking produce delicate shells with smooth surfaces, characteristic ruffled feet, and tender interiors. These versatile macaron shells provide an ideal foundation for a wide variety of professional pastry fillings.
Sugar Syrup Temperature: 118°C
Baking Temperature: 150°C
Surface Drying: Approximately 20 minutes
Recommended Shell Diameter: 3.5–4 cm
Filling: Not included in the original formula

Ingredients
Ingredients by component
1. Almond Macaron Paste
- Finely ground almond flour140 g
- Powdered sugar140 g
- Egg whites60 g
- Gel food coloring, optionalAs needed
2. Italian Meringue
- Granulated sugar180 g
- Water60 g
- Egg whites60 g
Total ingredient weight: 640 g, excluding optional coloring.
Preparation
Step-by-step method
BAKING
1. Prepare the Almond Paste
Place the finely ground almond flour and powdered sugar in a mixing bowl.
Mix thoroughly to distribute the ingredients evenly.
Pass the mixture through a fine sieve to remove any coarse almond particles or lumps.
Transfer the sifted dry ingredients to a clean mixing bowl.
Add the first portion of egg whites (60 g).
Add a small amount of gel food coloring if desired.
Mix using a silicone spatula until a thick, homogeneous almond paste forms.
Ensure there are no visible pockets of dry ingredients.
Cover the paste and reserve at room temperature while preparing the Italian meringue.
The finished paste should be thick, smooth, and evenly colored.

Powdered sugar held above a mixing bowl. 
Almond flour being added to the bowl. 
Almond flour and powdered sugar being mixed. 
The first portion of egg whites being added to the dry mixture. 
Colored almond paste being mixed with a spatula.
2. Prepare the Italian Meringue
Place the granulated sugar and water in a heavy-bottomed saucepan.
Heat over medium heat, monitoring the temperature with a digital thermometer.
Meanwhile, place the second portion of egg whites (60 g) in the bowl of a stand mixer fitted with a whisk attachment.
Begin whipping the egg whites so that they become lightly foamy before the syrup reaches its final temperature.
Continue heating the sugar syrup until it reaches 118°C.
Remove immediately from the heat.
With the mixer running, gradually pour the hot syrup into the lightly whipped egg whites in a thin, steady stream.
Direct the syrup between the whisk and the side of the bowl to minimize splashing.
Once all the syrup has been incorporated, increase the mixer speed.
Continue whipping until the meringue becomes glossy, smooth, and stable.
Allow the meringue to cool during whipping until it is no longer hot and is suitable for incorporation into the almond paste.
The finished Italian meringue should be glossy, stable, and sufficiently flexible for folding.

Sugar being added to water in a saucepan. 
Sugar syrup boiling with a thermometer in the saucepan. 
Sugar syrup being added at the mixer bowl. 
Glossy Italian meringue held on the whisk.
3. Macaronage — Incorporating the Meringue
Add approximately one-third of the Italian meringue to the prepared almond paste.
Mix using a silicone spatula to loosen the dense almond mixture.
Add the second third of the meringue.
Fold gently, scraping the bottom and sides of the bowl.
Add the remaining meringue.
Continue folding using controlled movements, bringing the batter from the bottom of the bowl toward the center.
Rotate the bowl as necessary to ensure even incorporation.
Continue the macaronage until the batter becomes smooth, glossy, and flows slowly from the spatula.
Check the consistency by lifting a portion of batter with the spatula.
The batter should fall in a continuous ribbon and gradually merge back into the mixture.
Stop folding as soon as the desired consistency is achieved.
Important: Overmixing produces an excessively fluid batter that spreads during piping, while undermixing can leave pronounced peaks and uneven shells.

Meringue added to the colored almond paste. 
Meringue being folded into the almond paste. 
Smooth pink macaron batter being worked with a spatula.
4. Pipe the Macaron Shells
Prepare baking trays lined with silicone baking mats.
Transfer the macaron batter into a piping bag fitted with a plain round nozzle.
Hold the piping bag vertically above the silicone mat.
Pipe evenly sized circles, approximately 3.5–4 cm in diameter.
Maintain consistent spacing between the shells.
Release pressure before lifting the piping bag to minimize peaks.
Gently tap the underside of the tray against the work surface if necessary to flatten the shells and release trapped air.
Inspect the piped shells for any visible air bubbles.
Pop large surface bubbles carefully using a fine skewer if needed.

Macaron batter piped vertically onto a silicone mat. 
A piped shell being formed on the silicone mat.
5. Rest the Macaron Shells
Leave the piped macarons uncovered at room temperature for approximately 20 minutes.
Allow a thin, dry skin to form on the surface.
Check the shells by touching the surface very lightly with a clean fingertip.
The batter should no longer stick to the finger.
Once the surface is sufficiently dry, proceed immediately to baking.
Resting time may vary depending on room temperature and humidity.
1. Bake the Macaron Shells
Preheat the oven to 150°C.
Ensure the oven has reached a stable temperature before loading the trays.
Place the prepared macaron tray in the oven.
Bake for approximately 14 minutes with the oven vent open, as specified in the original method.
During baking, the shells should rise gradually and develop their characteristic ruffled feet.
Monitor the macarons to prevent excessive browning.
At the end of baking, check that the shells are sufficiently set.
Remove the tray from the oven.
For a home oven without an adjustable vent, the original method suggests briefly opening the oven door for approximately 5 seconds halfway through baking to release accumulated humidity. This is an oven-specific adjustment rather than a guarantee of consistent results.
2. Cool the Shells
Allow the baked macarons to cool completely on their silicone baking mat.
Avoid removing the shells while warm, as the delicate bases may tear.
Once fully cooled, gently release the shells from the mat.
Arrange the shells in matching pairs according to diameter and shape.
Reserve for filling.

Baked pink shells with smooth tops and ruffled feet.
Final stage
Assembly & finishing
1. Match the Macaron Shells
Arrange the cooled macaron shells on a clean work surface.
Match shells of similar diameter and thickness.
Position one shell from each pair with its flat side facing upward.
Reserve the matching top shells.
2. Fill the Macarons
Prepare a suitable macaron filling separately, such as chocolate ganache, fruit ganache, or buttercream.
Transfer the prepared filling to a piping bag.
Pipe a controlled amount onto the center of each bottom shell.
Position the matching shell over the filling.
Press gently until the filling spreads evenly toward the edges without overflowing.
Repeat with the remaining shells.
The original formula provides the macaron shell preparation only. The filling type and quantities are therefore not specified.

Paired pink shells showing their ruffled edges; filling is not specified.
Storage
Unfilled macaron shells can be stored in an airtight container in a cool, dry environment for short-term use.
For longer storage, freeze the completely cooled shells in an airtight, freezer-safe container at −18°C, protecting them from moisture and breakage.
Once filled, storage conditions depend on the filling ingredients. Macarons containing perishable ganache or cream-based fillings should be refrigerated at 2–4°C.
Allow refrigerated macarons to temper briefly before serving for the intended texture and flavor.
Professional pastry tips
Tips from the chef
Almond flour: Use finely ground almond flour to achieve a smooth shell surface.
Dry ingredient preparation: Sift the almond flour and powdered sugar to remove coarse particles and lumps.
Egg whites: Weigh the egg whites accurately, dividing them into two equal portions of 60 g.
Sugar syrup: Cook the Italian meringue syrup precisely to 118°C.
Meringue preparation: Begin whipping the egg whites before adding the hot syrup, ensuring they are lightly foamy.
Syrup incorporation: Pour the hot syrup gradually to avoid splashing and ensure even incorporation.
Meringue texture: Whip until smooth and glossy, allowing the mixture to cool before macaronage.
Macaronage: Fold until the batter flows in a slow ribbon and gradually settles back into itself.
Overmixed batter: Excessively fluid batter can produce flat, spreading macarons with poorly developed feet.
Undermixed batter: A batter that remains too thick can produce visible peaks, uneven surfaces, and cracked shells.
Piping: Maintain a consistent piping angle and diameter for uniform baking.
Tray tapping: Tap gently to release trapped air without causing excessive spreading.
Surface drying: Allow the shells to develop a thin skin before baking.
Oven humidity: Control moisture according to the oven's ventilation system.
Baking consistency: Verify the actual oven temperature with a reliable thermometer.
Cooling: Allow the shells to cool completely before removing them from the baking mat.
Final Result: Delicate French macaron shells with smooth, refined surfaces, characteristic ruffled feet, a thin crisp exterior, and a soft, tender interior—prepared using the traditional Italian meringue method.
The recipe provides a reliable technical framework, but perfectly smooth shells and consistent feet cannot be guaranteed in every oven; the final result also depends on macaronage, humidity, piping, and baking conditions.
More from PastryCrafted