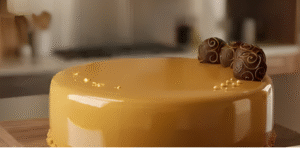
The Golden Armor: Introduction to Milk Chocolate Mirror Glaze
In the visual language of French pâtisserie, the finish is everything. A mousse cake may be technically perfect on the inside, but it is the exterior that seduces the eye. The Mirror Glaze (Glaçage Miroir) is the ultimate expression of this finish—a flawless, reflective coating that envelops the dessert in liquid glass.This specific recipe is technically a Milk Chocolate Glaze tinted to achieve a warm, sophisticated "Caramel" or "Gold" aesthetic. While traditional caramel glazes rely on burning sugar (which can introduce bitterness), this method uses the creaminess of milk chocolate and sweetened condensed milk to create a rich, dulce de leche-like flavor profile with a stunning amber hue.Why is this recipe a staple in professional kitchens? It is robust, forgiving, and incredibly shiny. Unlike fruit glazes which can be temperamental, this chocolate-based glaze relies on a specific sugar syrup cooked to 103°C to ensure perfect stability. When poured over a frozen entremet, it shocks into a suspended state, creating a layer that is barely millimeters thick yet perfectly opaque. It hides imperfections, seals in moisture, and adds a delicate creamy sweetness that complements coffee, hazelnut, and vanilla desserts beautifully.
Ingredients
120gglucose syrup
120gsugar
60gwater Part I
8gpowdered gelatin
48gcold water Part II
120gmilk chocolate couverture
80gsweetened condensed milk
Yellow gel food coloring
Instructions
Bloom gelatin in cold water (Part II).
Bring glucose, sugar, water (Part I) to 103°C.
Remove from heat, stir in condensed milk and gelatin.
Pour over chocolate, let sit, add color, and blend gently.
Cover with plastic wrap touching the surface. Chill overnight.
Notes
The Science of Ingredients: The Alchemy of Shine
A mirror glaze is not just melted chocolate; it is a carefully balanced emulsion of sugar, water, fat, and protein. Here is the science behind why it works.
1. Glucose Syrup (The Anti-Crystal)
You will notice the recipe calls for equal parts sugar and glucose (120g each).
The Science: Sucrose (table sugar) naturally wants to recrystallize into a solid, grainy mass when water evaporates. Glucose syrup is an "interfering agent." Its long molecular chains get in the way of sucrose molecules, preventing them from bonding. This ensures the glaze remains fluid and flexible. Additionally, glucose provides viscosity, giving the glaze "body" so it coats the cake rather than running off like water.
2. The 103°C Boiling Point
The instructions specify bringing the syrup to exactly 103°C.
The Science: Cooking sugar syrup is about water content control. As sugar syrup boils, water evaporates, and the boiling point rises. At exactly 103°C, the water concentration is perfectly reduced to create a suspension that will hold the chocolate and condensed milk without separating. If you stop at 100°C, the glaze will be too watery and slide off the cake. If you go to 110°C, it will become too thick and chewy (like soft candy) on top of your delicate mousse.
3. Sweetened Condensed Milk
This is the secret to opacity and texture.
The Science: Condensed milk creates the "background" of the glaze. It contains milk solids and sugar that have been concentrated. These solids reflect light, giving the glaze its opacity (hiding the cake layers underneath). It also adds a creamy, dairy-rich mouthfeel that bridges the gap between the sugary syrup and the fatty chocolate.
4. Gelatin (The Mesh)
Gelatin is the structural net that holds the liquid on the vertical sides of a cake.
The Science: In a mirror glaze, gelatin works in tandem with the cocoa butter in the chocolate. While cocoa butter provides the shine, gelatin provides the elasticity. This allows you to cut a slice of cake without the glaze dragging or cracking. It gives the glaze a "shear-thinning" property—it flows when poured but sets instantly when it hits the frozen cake.
5. Milk Chocolate Couverture
Using "couverture" is key because of its high cocoa butter content (usually 30%+).
The Science: Cocoa butter is a fat that crystallizes. When emulsified properly, these fat crystals align to create a reflective surface. Milk chocolate specifically contains milk solids, which undergo the Maillard reaction during the manufacturing process, contributing to that caramel/toffee flavor note that defines this glaze.
Essential Professional Kitchen Tools
To achieve a competition-level shine without air bubbles, specific tools are required.
Digital Probe Thermometer (Fast-Read)
Why you need it: Glazing is a temperature game. You need to cook the syrup to exactly 103°C, and more importantly, you must pour the glaze between 32°C and 35°C. A difference of 2 degrees can ruin the finish. A slow analog thermometer won't keep up.
Immersion Blender (Stick Blender)
Why you need it: You cannot whisk a mirror glaze; whisking incorporates air, which creates bubbles that ruin the mirror effect. An immersion blender creates a vortex that sucks the ingredients down and emulsifies the fat (cocoa butter) and water (syrup) into a homogenous liquid without adding air.
Tall, Narrow Pitcher
Why you need it: To blend without adding air, the head of your immersion blender must be fully submerged. A wide bowl forces you to tilt the blender, risking air intake. A tall, narrow pitcher (like a 1-liter measuring jug) keeps the fluid level high above the blades.
Fine Mesh Sieve (Chinois)
Why you need it: Even with a blender, small particles of undissolved gelatin or unmelted chocolate clumps can remain. Straining the glaze before letting it rest ensures a glass-smooth consistency.
Off-Set Spatula
Why you need it: Once you pour the glaze, you have about 3 seconds to swipe across the top to remove excess glaze before it sets. A long off-set spatula is the only tool for this job.
Expert Tips and Success Hacks
Achieving a flawless mirror finish is notoriously difficult. Here are 5 pro tips to guarantee success.
1. The Overnight Rest Rule
Never use a mirror glaze the same day you make it.
The Hack: Freshly made glaze is full of micro-bubbles from blending. By letting it rest in the fridge for 12–24 hours, the gelatin fully hydrates, the texture stabilizes, and the micro-bubbles rise to the surface and pop. Reheat it gently to 35°C the next day for a perfect, bubble-free finish.
2. The "Condensation Swipe"
Glaze slides off water.
The Hack: When you pull your entremet from the deep freezer (-18°C), ambient humidity will immediately turn into frost on the surface of the cake. If you pour glaze over this frost, the water layer will repel the glaze, causing it to slide off in sheets. Immediately before pouring, run your warm, dry hand gently over the cake to melt and wipe away the frost.
3. The Viscosity Spoon Test
Thermometers can sometimes be slightly off. Trust your eyes.
The Hack: At 35°C, dip a metal spoon into the glaze and look at how it coats the back. Run a finger through it. It should coat the spoon like heavy cream—about 1-2mm thick. If it's translucent and runs like milk, it's too hot. If it globs up like pudding, it's too cold.
4. Burping the Blender
This is the most common mistake for beginners.
The Hack: Place your blender into the liquid at an angle. You will see a large bubble escape from under the safety guard. This is called "burping." Only turn the blender on after this bubble has escaped. Keep the blades submerged at all times. If you see a vortex forming on the surface, you are sucking in air—stop immediately.
5. The "Clean Cut" Drip
After glazing, drips will form at the bottom of the cake.
The Hack: Do not wait for them to solidify. While they are still semi-liquid, use a small knife or spatula to shave the drips flush against the bottom of the cake board. This ensures a clean edge when you transfer the cake to the serving plate.
Frequently Asked Questions (FAQ)
Q1: Why is my glaze rubbery and hard to cut?A: This is usually caused by two things: too much gelatin (ensure you weigh it precisely) or over-boiling the syrup past 103°C. If the syrup gets too hot, too much water evaporates, and the glaze becomes like a gummy candy. It can also happen if the glaze was poured too cold (below 30°C), resulting in a layer that is too thick.Q2: Can I reuse leftover glaze?A: Absolutely. Mirror glaze can be stored in the fridge for up to 2 weeks or frozen for months. To reuse it, melt it gently in the microwave (in 30-second bursts) or over a water bath until it reaches about 40°C, then blend it again (carefully!) and let it cool down to the working temperature of 35°C.Q3: Can I use white chocolate instead of milk chocolate?A: Yes, this recipe works perfectly with white chocolate. If using white chocolate, the glaze will be ivory/yellowish. You will need to add white food coloring (titanium dioxide) if you want a pure white glaze, or you can add any other gel colors. The "Caramel" look here relies on the brown tones of the milk chocolate.Q4: Can I use Agar Agar instead of Gelatin?A: Generally, no. Agar agar sets much harder and is brittle (it snaps rather than stretches). It does not provide the elasticity needed for a mirror glaze that cuts cleanly. It also has a different melting point. For a true mirror finish, animal or fish gelatin is the industry standard.Q5: Why did the glaze melt my mousse?A: Your glaze was too hot. Mousse is aerated cream and fat; it begins to melt at remarkably low temperatures. If you pour glaze at 40°C or higher, it will melt the outer millimeter of the mousse, mixing the cream into the glaze and creating milky streaks. Always wait for 35°C (95°F).