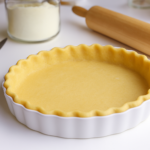
Short crust Pastry
The Alphabet of Pâtisserie: Introduction to Pâte Brisée
In the world of French pastry, Shortcrust Pastry (or Pâte Brisée) is the foundation upon which empires of fruit and custard are built. It is the "Little Black Dress" of doughs: simple, versatile, and essential. Unlike the sweeter, cookie-like Pâte Sucrée or the richer Pâte Sablée, a classic shortcrust is defined by its neutral flavor and its delicate, flaky texture that crumbles ("breaks") pleasantly when bitten.This specific recipe elevates the humble mixture of flour, butter, and water with a secret weapon: White Vinegar. While traditionalists might rely solely on technique to prevent toughness, this recipe uses chemistry to guarantee a tender crust every time. Whether you are crafting a rustic apple galette, a savory quiche lorraine, or a delicate lemon tart, mastering this dough is the first step towards pastry liberation. It requires no fancy equipment—just your hands and a little patience.Ingredients
Shortcrust pastry :
- 120 g flour type 55
- 10 g sugar for sweet tarts
- pinch of salt
- 90 g softened butter
- 33 g water
- one teaspoon white vinegar optional
Instructions
Shortcrust pastry :
- Either you have a food processor and can make your pastry in it, using the sheet. Or you don't have one, and you can make it by hand on your work surface or in a large bowl.
- Pour the flour, sugar and salt into your bowl (or onto the work surface).
- Add the softened butter and mix. The dough should be slightly sandy.
- Add the water and white vinegar and mix until the dough is smooth.
- Place in cling film and leave to rest in the fridge for an hour. You can keep the dough in this form in the fridge for 2 to 3 days. It also freezes well.
- Take your dough out of the fridge and roll it out, flouring your work surface to prevent it from sticking.
- Prick the base with a fork and leave to rest in the fridge for another hour.
Baking the shortcrust pastry :
- If you're using very juicy fruit, or if you're adding a flan, I recommend pre-cooking the pastry to prevent the bottom of your tart from being undercooked.
- You can also add a little breadcrumbs before placing your fruit, to absorb the fruit juices instead of your pastry.
- To pre-bake, place the tart in the oven at 170°C (fan assisted) for 10 minutes.
- The rest of the baking time will vary according to your tart recipe. But remember that this dough is perfectly suited to long cooking times.
Notes
The Science of Ingredients: Chemistry of the "Short" Texture
Why does this simple mix of four ingredients work? It comes down to managing gluten and fat.1. White Vinegar (The Gluten Inhibitor)
The addition of vinegar is the "chef's secret" in this recipe.- The Science: Flour contains proteins (glutenin and gliadin) that form elastic gluten networks when mixed with water. While you want gluten in bread (for chew), you want to minimize it in pastry (for tenderness). Acid, such as vinegar, weakens these gluten bonds, relaxing the dough and preventing it from becoming tough or rubbery. Additionally, vinegar lowers the pH, which prevents the dough from oxidizing and turning an unappetizing grey color if stored in the fridge for several days.
2. Butter (The Waterproofing Agent)
The recipe calls for "softened" butter mixed into flour until "sandy."- The Science: This technique is called Sablage (sanding). By coating the flour particles in fat before adding the water, you are essentially waterproofing the flour. This fat barrier prevents the water from reaching the gluten proteins too quickly. If the water can't reach the protein, strong gluten networks cannot form. This creates a "short" texture—meaning the dough breaks apart easily rather than stretching.
3. Flour Type 55 (Protein Content)
The recipe specifies Type 55 (T55) flour.- The Science: In France, T55 is the standard all-purpose pastry flour with a moderate protein content (around 9-10%). It strikes the perfect balance. Bread flour (high protein) would make a tough crust; Cake flour (low protein) might be too crumbly to hold the weight of juicy fruit. T55 provides just enough structure to hold a heavy filling without becoming chewy.
4. Resting Time (Hydration)
The recipe insists on a 1-hour rest.- The Science: When you first mix the dough, the moisture is unevenly distributed. Resting allows the starch in the flour to fully hydrate, absorbing the water evenly. It also allows any gluten strands that did form during mixing to relax. If you try to roll out the dough immediately, it will be elastic (springing back) and likely shrink in the oven.
Essential Professional Kitchen Tools
While you can make this by hand, a few tools ensure professional consistency.-
Perforated Tart Ring
- Why you need it: Unlike a solid ceramic or glass dish, a perforated metal ring allows hot air to circulate directly against the crust. This evaporates moisture instantly, ensuring the sides are crisp and straight, rather than soggy and slumped.
-
Rolling Pin with Thickness Guides
- Why you need it: Consistency is key. If one side of your crust is 3mm and the other is 6mm, they will bake unevenly. Rolling pin rings or guide sticks help you achieve a perfectly uniform thickness (usually 3mm for tarts).
-
Docking Tool (or Fork)
- Why you need it: "Docking" means pricking holes in the dough. This allows steam to escape from underneath the crust during baking. Without these holes, trapped steam will bubble up, creating an uneven surface that creates gaps between your crust and filling.
Expert Tips and Success Hacks
Achieve the perfect golden shell with these five professional secrets.1. The "Breadcrumb Shield"
Juicy fruits (like plums or rhubarb) are the enemy of a crisp bottom.- The Hack: Before arranging your fruit on the raw pastry, sprinkle a layer of breadcrumbs, semolina, or ground almonds over the base. This layer acts as a sponge, absorbing the fruit juices as they release during baking, preventing them from soaking into the pastry below.
2. Pre-Baking (Blind Baking)
For custard fillings (like lemon curd) that aren't baked, the shell must be fully cooked first.- The Hack: Line your tart shell with crumpled parchment paper and fill it to the brim with baking weights (or dried beans/rice). Bake for 10-15 minutes to set the shape. Then, remove the weights and paper, and bake for another 5-10 minutes to brown the bottom. This ensures the crust is crisp through and through.
3. Patching Cracks
Shortcrust is fragile. If it tears while lining the mold, don't panic.- The Hack: Do not pinch the dough together (which makes it thin). Instead, take a scrap of excess dough, moisten it slightly with water, and press it like a bandage over the tear. Smooth it out with your thumb. It will fuse during baking.
4. The Freezer Chill
Prevent shrinkage in the oven.- The Hack: Once you have lined your tart ring, place the entire thing in the freezer for 15 minutes before putting it in the hot oven. This shocks the butter and relaxes the gluten one last time. The colder the dough is when it hits the heat, the less likely it is to shrink down the sides of the ring.
5. Egg Wash for Shine
A pale crust looks undercooked.- The Hack: For a glossy, golden finish, whisk an egg yolk with a teaspoon of cream. Brush this mixture over the edges of the tart (and the bottom, if blind baking) during the last 5 minutes of baking. It acts as a sealant against moisture and gives a professional sheen.
Frequently Asked Questions (FAQ)
Q1: My dough is too crumbly to roll out. What happened? A: This usually means it lacks hydration or was too cold. If it falls apart like sand, you may need a teaspoon more water. If it's just cracking because it's fridge-cold, whack it firmly with your rolling pin a few times to soften the butter without warming it up with your hands. Q2: Can I use this dough for savory tarts? A: Absolutely. This is the beauty of Shortcrust. Simply omit the 10g of sugar mentioned in the recipe. You can even add dried herbs (thyme, rosemary) or grated parmesan to the flour mixture for a savory kick. Q3: Why did my pastry shrink down the sides of the tin? A: Shrinkage is caused by two things: overworked gluten or not resting the dough enough. If you stretched the dough while lining the tin, it will snap back like a rubber band when heated. Always lift and press the dough into the corners; never stretch it. Q4: Can I freeze the dough? A: Yes. Shortcrust freezes beautifully for up to 3 months. Wrap it tightly in plastic wrap (cling film) and then foil. The addition of vinegar in this recipe also helps preserve the color during freezing. Thaw it in the fridge overnight before using. Q5: Should I use salted or unsalted butter? A: The recipe calls for a "pinch of salt," which suggests unsalted butter allows for better control. However, if you only have salted butter, omit the extra pinch of salt. The salt content in butter is rarely high enough to ruin a pastry, but control is always preferred.
